I've been creating collages after a shoot as a part of my workflow for quite sometime now. The collage that I create is actually used as a "summary" to help me with memory and organization. Way back, I created a simple contact sheet. Then, I found out that Google's Picasa can create a nice looking collage with just a simple click of a button. However, I've been having problems with Picasa on my Mac (Snow Leopard, I don't know if that has anything to do with it), so I started looking for a way to create a collage with photoshop and came across "BnBig Picture" action from PanosFX.com. It takes a little more time, but I think the results are beautiful and worthwhile.
Programs and files required:
1. Photoshop CS3 or higher
2. Adobe Bridge or Lightroom
3. "BnBig Picture" from PanosFX.com
MAC OSX
WINDOWS
They’ll be two steps to creating a collage. First, you’ll have three choices: Adobe Bridge, Adobe Lightroom or Adobe Photoshop for selecting and creating a “contact sheet”. Here, I’ll show how to create a contact sheet using either Bridge or Lightroom. For Photoshop, just open 25 pictures in PS and select the “Matrix” action that comes with “Big Pictures”. It’ll pretty much do what Bridge or Lightroom does. However, I wouldn’t recommend the Photoshop method; depending on the size of the pictures and the speed of the computer, it can take some time before you get your contact sheet. Second, you’ll be using Photoshop to turn the contact sheet into a collage.
1. Start up Adobe Bridge and select 25 pictures, preferably in the same orientation (either landscape or portrait). If different orientations are selected, you’ll have to rotate them later (click here on how to easily rotate your photos). However, if you’re using the different perspectives at the end of the Big Pictures action, then you’ll want it in the same orientation.
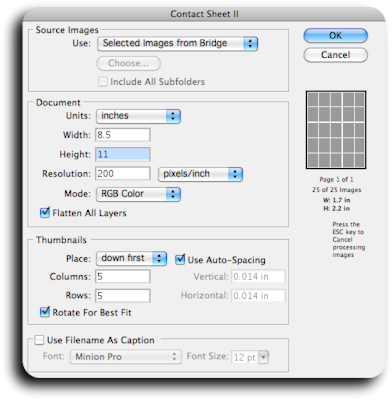
2. Select: TOOLS - PHOTOSHOP - CONTACT SHEET II (picture)
· If you're using either CS4 or CS5, and don't see CONTACT SHEET II, you'll need to install Optional Plug-ins.
· If you get a "command "" is not currently available", set photoshop so that it opens in 32-bit mode.


3. If your photos are landscape orientation, then make sure your document settings are also landscape orientation and vice versa with portrait. Also, make sure you’re creating a 5X5 contact sheet. Press Ok and your contact sheet will be created in Photoshop.
4. Save your contact sheet, close the window and Go to STEP TWO: Photoshop
1. Start up Adobe Lightroom and select 25 pictures, preferably in the same orientation (either landscape or portrait). If different orientations are selected, you’ll have to rotate them later (click here on how to easily rotate your photos). However, if you’re using the different perspectives at the end of the Big Pictures action, then you’ll want it in the same orientation.
2. Go to the PRINT Module, navigate to the Print Job panel towards the bottom right hand corner and select print to JPEG File.
3. Towards the bottom left hand corner, press the Page Setup button and select your paper size (borderless option if available). If your photos are landscape orientation, then make sure your orientation settings are also landscape orientation and vice versa with portrait. Press Ok.
4. Below are my settings for the different panels. Select what’s best for you, but in the Layout, a 5X5 grid is a must.
Photoshop:
1. Download the action file "BnBig Picture" and unzip.
2. Open Actions Palette.
a. WINDOW - ACTIONS or
b. Option F9 or Alt F9
3. Select Load Actions (picture). Navigate to the unzipped downloaded file and select “The BnBig picture.atn”
4. There should now be “PFx_BIG PICTURES_free” in the actions tab. Select flat or curled and follow the instructions and press play selection button.
5. Once the action has stopped, navigate to the History Panel and you’ll have a few perspectives to choose. If you have both landscape and portrait orientation in the collage, you’ll need to rotate the photos so they match.
1. Once the action has been completed and the collage has been created, you’ll notice that each photo is on its own layer. The action groups all layers, so right-click on the folder and ungroup layers (picture).
2. Now you can command or control left-click any photo on the collage to select that photo’s layer, and then rotate.


